Deploying an application with ArgoCD
This guide walks through deploying an application end to end using the Container
Platform GitOps workflow. You describe your workload in Git, open a pull
request, and once it merges ArgoCD deploys it to the target cluster for you.
There is no kubectl apply and no manual ArgoCD step: the merge is the deploy.
It ties together two earlier guides, Adding a New Product and Adding a service deployment, into a single worked example you can follow start to finish. It deploys a public container image to one non-live environment, which is the smallest complete path that proves the workflow.
How GitOps deployment works
Your workloads live in the container-platform-environments repository. ArgoCD
watches that repository and keeps each cluster matching what is committed. Two
processes read your files:
- The baseline process reads your
product.yamland creates the namespace, a default-deny network policy, and the role bindings that grant your team access. - The workload process reads each environment values file and deploys your service’s Helm chart into the mapped namespace.
Because Git is the source of truth, deploying, updating, and rolling back are all ordinary pull requests. Non-live environments sync automatically once a change merges.
Before you start
You need:
- Write access to the
container-platform-environmentsrepository, where all workloads are declared. - A target business unit and non-live cluster. This guide uses
octoandcontainer-platform-octo-nonlive. - A container image from a public registry. This guide uses
nginxinc/nginx-unprivileged, which listens on port 8080 and needs no configuration. helminstalled locally, to validate your chart before you open a pull request.
You do not need cluster credentials to deploy. They are useful for verifying the
result afterwards. See
Accessing the Platform
for how to get kubectl access.
What you will create
A product follows a fixed layout so the platform can find it. This guide creates
a product called my-app with a single service, also called my-app, under the
octo business unit:
namespaces/octo/my-app/
├── product.yaml                         # declares environments + access
└── my-app/
    └── deployment/                      # the service Helm chart
        ├── Chart.yaml
        ├── values.yaml                  # defaults (image, resources, service)
        ├── templates/
        │   ├── deployment.yaml
        │   ├── service.yaml
        │   └── httproute.yaml           # routes the hostname to the Service
        └── values/
            └── nonlive/
                └── dev.yaml             # per-environment overrides + routing
Step 1: Declare the product
Create namespaces/octo/my-app/product.yaml. This declares one non-live
environment and grants your GitHub team edit on the non-live cluster.
product: my-app
bu: octo
owner:
  team: my-team
  slack: "#my-team-channel"
  source: https://github.com/ministryofjustice/container-platform-environments
environments:
  - name: dev
    cluster: container-platform-octo-nonlive
    namespace: my-app-dev
    is_production: false
access:
  - group: my-team
    role: edit
    clusters:
      - container-platform-octo-nonlive
The namespace value is the namespace created on the cluster. The group value
is your GitHub team, which the platform maps to cluster access. is_production:
false marks this as non-live; live environments have extra requirements covered
in a later guide. See
Adding a New Product
for the full reference.
Step 2: Create the service Helm chart
Create namespaces/octo/my-app/my-app/deployment/Chart.yaml:
apiVersion: v2
name: my-app
description: my-app service
type: application
version: 1.0.0
appVersion: "1.0.0"
Create deployment/values.yaml with the defaults. Pin the image by tag and
digest so a deploy is reproducible and a moving tag cannot change what runs:
# Default values for my-app. Overridden per environment by values/<tier>/<env>.yaml
replicaCount: 1

image:
  repository: nginxinc/nginx-unprivileged
  tag: "1.27.4"
  digest: "sha256:<pin-the-digest-you-tested>"

resources:
  requests:
    cpu: 50m
    memory: 64Mi
  limits:
    cpu: 100m
    memory: 128Mi

service:
  port: 80
  targetPort: 8080
Create the templates. deployment/templates/deployment.yaml runs the container
with the security context that platform namespaces enforce (non-root, no
privilege escalation, all capabilities dropped):
apiVersion: apps/v1
kind: Deployment
metadata:
  name: my-app
  labels:
    app: my-app
spec:
  replicas: {{ .Values.replicaCount }}
  selector:
    matchLabels:
      app: my-app
  template:
    metadata:
      labels:
        app: my-app
    spec:
      securityContext:
        runAsNonRoot: true
        seccompProfile:
          type: RuntimeDefault
      containers:
        - name: my-app
          image: "{{ .Values.image.repository }}:{{ .Values.image.tag }}@{{ .Values.image.digest }}"
          ports:
            - containerPort: {{ .Values.service.targetPort }}
          securityContext:
            allowPrivilegeEscalation: false
            capabilities:
              drop: ["ALL"]
          resources:
            requests:
              cpu: {{ .Values.resources.requests.cpu }}
              memory: {{ .Values.resources.requests.memory }}
            limits:
              cpu: {{ .Values.resources.limits.cpu }}
              memory: {{ .Values.resources.limits.memory }}
deployment/templates/service.yaml:
apiVersion: v1
kind: Service
metadata:
  name: my-app
  labels:
    app: my-app
spec:
  selector:
    app: my-app
  ports:
    - port: {{ .Values.service.port }}
      targetPort: {{ .Values.service.targetPort }}
      protocol: TCP
To reach the app over HTTPS, add an HTTPRoute that attaches to the shared
platform listener, default-listenerset in the envoy-gateway-system namespace.
That listener already terminates TLS for any hostname under the cluster wildcard
*.<business-unit>.container-platform.service.justice.gov.uk, so a route is all
you need. deployment/templates/httproute.yaml:
apiVersion: gateway.networking.k8s.io/v1
kind: HTTPRoute
metadata:
  name: my-app
spec:
  parentRefs:
    - name: default-listenerset
      namespace: envoy-gateway-system
      kind: ListenerSet
      group: gateway.networking.k8s.io
      sectionName: https
  hostnames:
    - {{ required "host must be configured" .Values.host | quote }}
  rules:
    - matches:
        - path:
            type: PathPrefix
            value: /
      backendRefs:
        - name: my-app
          port: {{ .Values.service.port }}
Because your hostname (my-app.octo-nonlive.container-platform.service.justice.gov.uk)
falls under that wildcard, you do not need to define your own listener or manage a
certificate. If you only need to prove the deploy and do not need external access
yet, you can omit the HTTPRoute and verify the Deployment directly. For a fuller
walkthrough of routing, see
Expose a service with Gateway API (HTTPRoute).
Using a custom domain
If your hostname is not under the cluster wildcard (for example a public
domain such as www.my-service.gov.uk), the shared listener cannot serve it: the
wildcard will not match, and its certificate does not cover your domain. In that
case, define your own ListenerSet with its own certificate and point the
HTTPRoute at it instead of default-listenerset.
deployment/templates/listenerset.yaml (custom-domain case only):
apiVersion: gateway.networking.k8s.io/v1
kind: ListenerSet
metadata:
  name: my-app
  annotations:
    cert-manager.io/cluster-issuer: {{ .Values.tls.clusterIssuer | quote }}
spec:
  parentRef:
    name: {{ .Values.gateway.name }}
    namespace: {{ .Values.gateway.namespace }}
    group: gateway.networking.k8s.io
    kind: Gateway
  listeners:
    - name: https
      hostname: {{ required "host must be configured" .Values.host | quote }}
      protocol: HTTPS
      port: 443
      tls:
        mode: Terminate
        certificateRefs:
          - name: my-app-tls
            kind: Secret
      allowedRoutes:
        namespaces:
          from: Same
When you use a custom ListenerSet, point the HTTPRoute parentRefs at your
own listener (name: my-app) rather than default-listenerset, and add the
gateway and tls keys back to your values files. cert-manager then issues a
certificate for your domain, so you must also have the DNS for that domain
pointing at the platform.
Step 3: Add the environment values file
Create deployment/values/nonlive/dev.yaml. Its location in the path sets the
tier (nonlive) and environment (dev), and the platform keys on this file to
create your Application:
namespace: my-app-dev
replicaCount: 1
host: my-app.octo-nonlive.container-platform.service.justice.gov.uk
The namespace value is required and must match the namespace you declared in
product.yaml (my-app-dev). It tells the platform which namespace to deploy
into. The host value is the hostname your HTTPRoute serves. Any other keys
override the chart defaults for this environment only.
Your Application is named <bu>-<service>-<env>, so this file produces one
called octo-my-app-dev. Note that name; you will look for it when you verify.
Step 4: Validate the chart locally
Render the chart with the environment values before you open a pull request. This
catches template errors and missing required values (such as host) without
waiting on ArgoCD:
cd namespaces/octo/my-app/my-app/deployment

# Lint the chart
helm lint . --values values.yaml --values values/nonlive/dev.yaml

# Render the manifests exactly as the platform will
helm template my-app . \
  --values values.yaml \
  --values values/nonlive/dev.yaml
Check that the Deployment references your pinned image, the Service targets port
8080, and the hostname is filled in on the HTTPRoute. If helm template fails
with host must be configured, your dev.yaml is missing the host key.
Step 5: Open a pull request and merge
Commit the new files on a branch, push, and open a pull request against main in
container-platform-environments:
git checkout -b deploy-my-app
git add namespaces/octo/my-app
git commit -m "Add my-app product and non-live deployment"
git push -u origin deploy-my-app
Once the pull request is reviewed and merged to main, the platform picks up the
change automatically. Non-live workloads sync on their own (with prune and
self-heal), so no further action is needed after the merge.
Step 6: Verify the deployment
The namespace is created first, then the workload deploys into it. If you check immediately, the workload may briefly show as degraded until the namespace exists. This is expected and clears on its own.
Point kubectl at the non-live cluster (see
Accessing the Platform),
then check your namespace:
kubectl -n my-app-dev get deploy,pods,svc
kubectl -n my-app-dev get httproute
The pod should be Running, and the HTTPRoute should show an Accepted
condition of True (check with kubectl -n my-app-dev describe httproute
my-app). Once DNS has propagated, the app answers at
https://my-app.octo-nonlive.container-platform.service.justice.gov.uk.
Watch the deployment in the ArgoCD UI
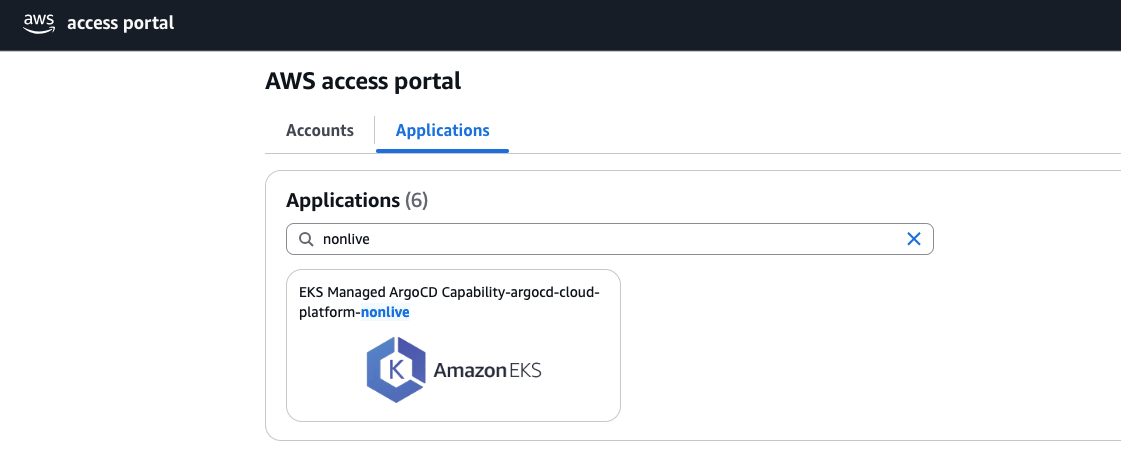
You can also follow the deployment in the ArgoCD web UI. Access is through the AWS access portal using your Container Platform SSO role.
- Sign in to the AWS access portal and open the Applications tab.
- Search for the environment tier you are deploying to (for example
nonlive) and open the matching ArgoCD capability, for example EKS Managed ArgoCD Capability-argocd-cloud-platform-nonlive. Non-live workloads are managed by the non-live hub; live workloads by the live hub.
- ArgoCD opens showing the Applications view. Search for your product name to filter to your Applications. Application (tenant) engineers get read-only access, which is enough to watch the sync.
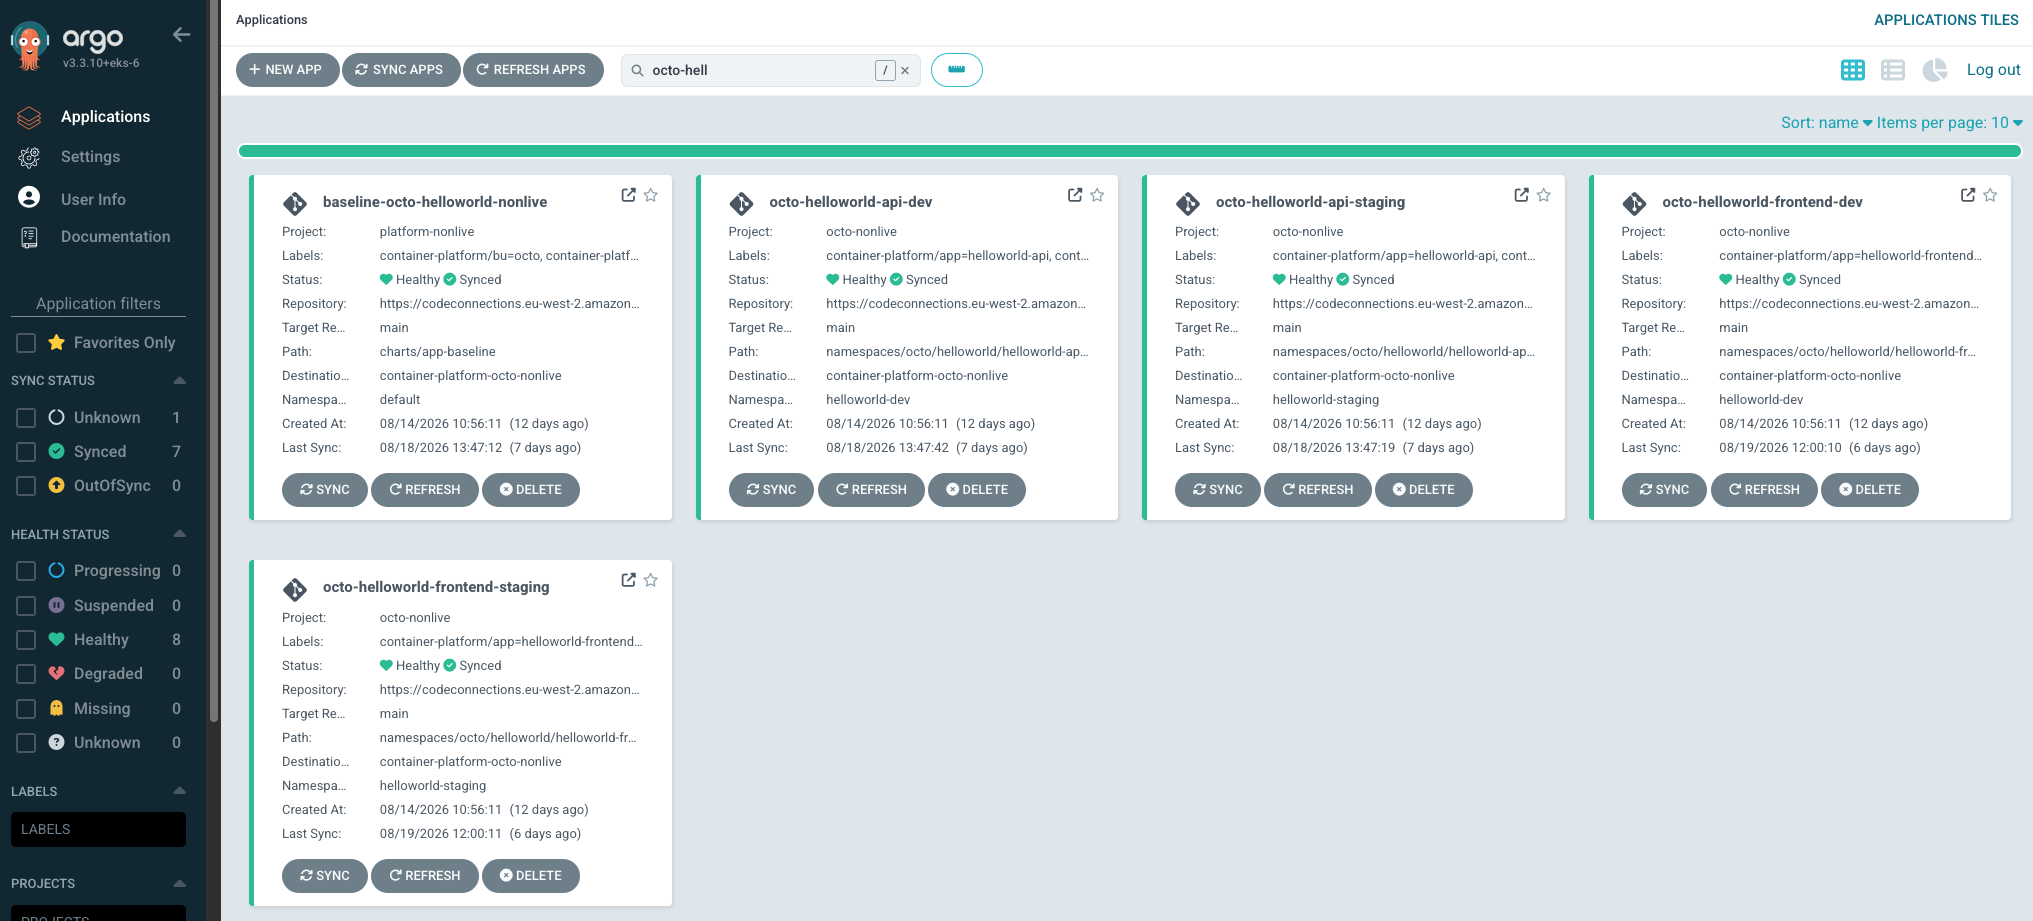
Example shown: the helloworld product. Your Applications will carry your
own product and service names.
Look for two items to reach Synced / Healthy:
baseline-octo-my-app-dev— creates the namespace, network policy, and role bindings.octo-my-app-dev— your workload.
Each tile shows the Sync Status (Synced or OutOfSync) and Health Status (Healthy, Progressing, Degraded, and so on), along with the source repository, target revision, and destination cluster and namespace.
Update your application
To deploy a new version, change the image and merge. Update image.tag and
image.digest in values.yaml (or override them in dev.yaml for this
environment only), open a pull request, and merge. The non-live workload syncs
automatically, so the new image rolls out within a sync cycle. Watch
octo-my-app-dev return to Synced / Healthy on the new version.
Roll back
Because Git is the source of truth, a rollback is a Git revert. Revert the commit that introduced the change and merge:
git revert <commit-sha>
git push
Self-heal reconciles the cluster back to the reverted state. Avoid rolling back by editing the cluster directly: the platform detects the drift and syncs it back to whatever is in Git.
Troubleshooting
The workload is stuck “Missing” or degraded on the namespace
The namespace has not been created yet. Confirm your product.yaml is valid and
sits at namespaces/octo/my-app/product.yaml. The workload cannot create its own
namespace; it waits for the baseline to create it first.
A deploy fails with a “forbidden” error
Your chart is trying to create a resource type that workloads are not allowed to create, such as a cluster-scoped resource. Workloads are limited to namespace-scoped resources (Deployments, Services, ConfigMaps, Secrets, routes, and similar). Remove the cluster-scoped resource from your chart.
The pod is stuck in ImagePullBackOff
The image reference is wrong or unreachable. Check the repository, tag, and
digest in values.yaml, and that the digest matches the tag. A public image
needs no credentials; a private image must live somewhere the cluster can pull
from.
Changes merged but nothing happened
Check the values file path is exactly
namespaces/octo/my-app/my-app/deployment/values/nonlive/dev.yaml. An extra or
missing directory level means no Application is created. Confirm the file reached
main.
Next steps
A later guide will cover the full development-to-live lifecycle using the
platform test application: publishing the image, promoting a workload from dev
through staging to prod, and the manual approval step that live deployments
require.